Showing posts with label Westalee Designs. Show all posts

Sunday, May 2, 2021

One Monthly Goal- April's Goal Completed


 April was a blur. It started off busy and continued through the month, leaving me short on time to do much myself. I set myself  to finish quilting this quilt. You can see my goal setting post here.  It is two days in to the new month and I am only posted it now.

\


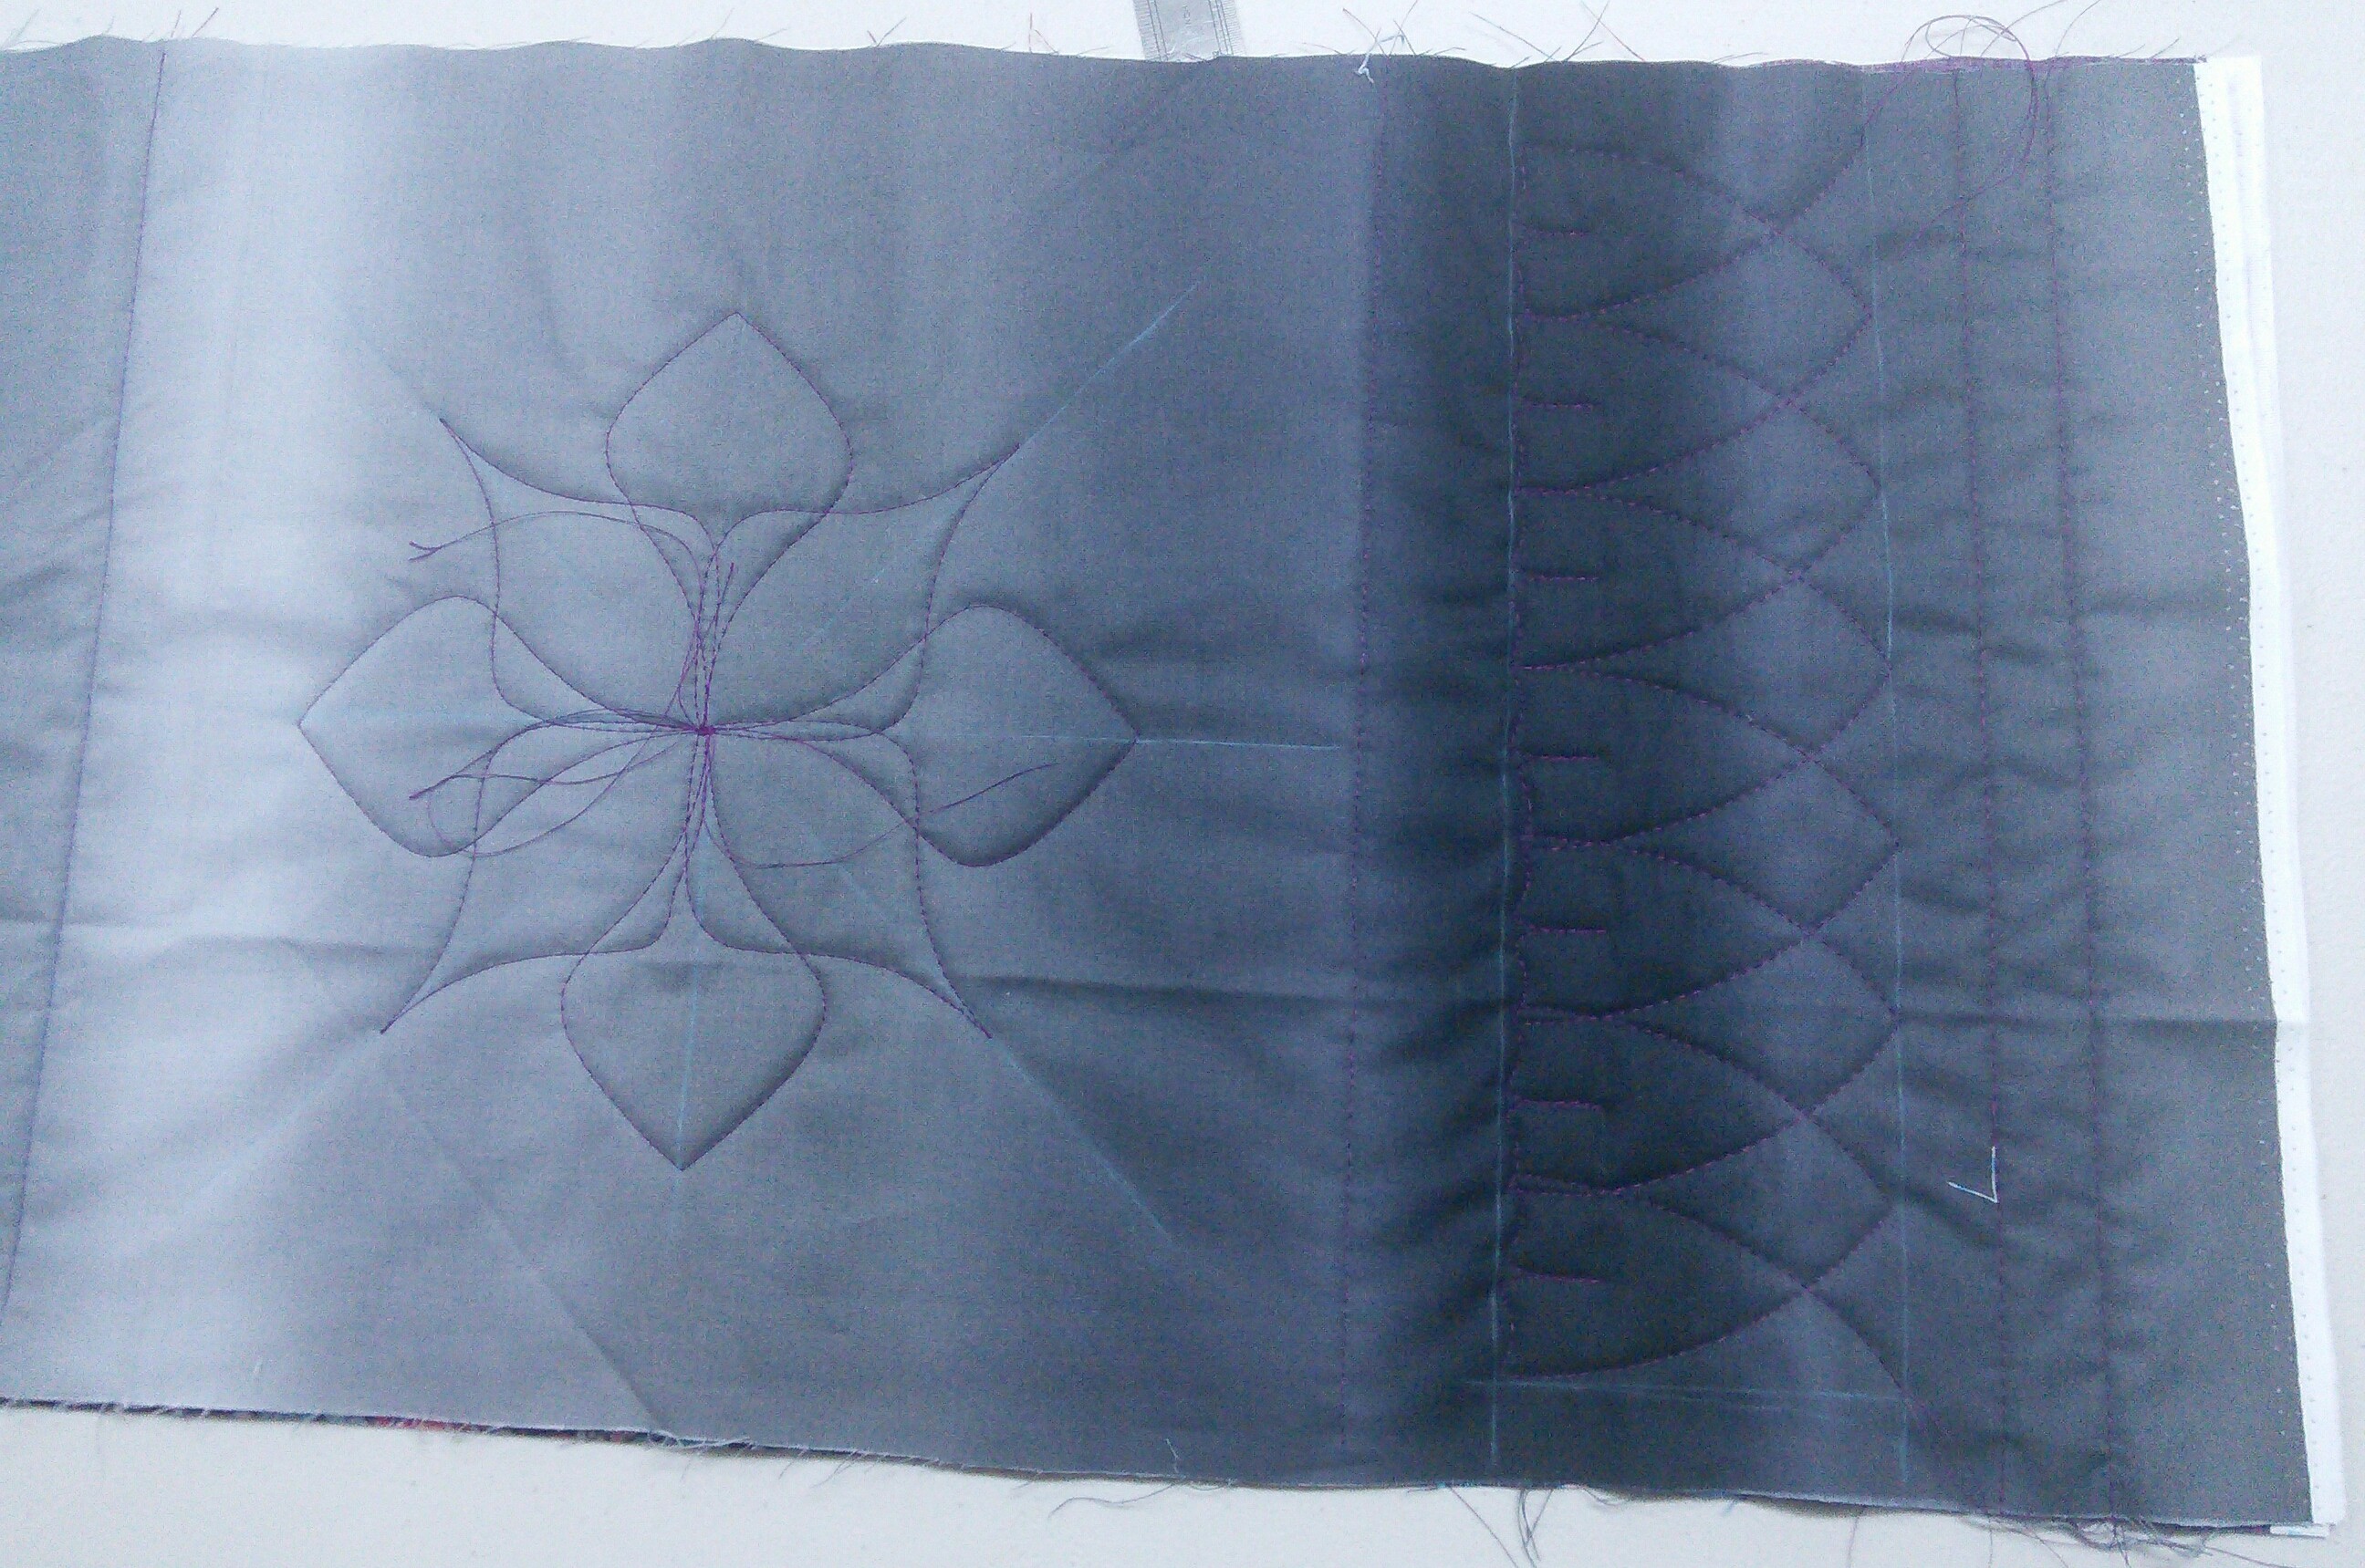
Now the month is coming to a close I can tell you I have finished the quilting all the way to the outside borders. I didn't get to binding it, but that is ok as I didn't think I would get there. The main aim was to finish quilting it, That job was done.

Some pictures of the back to show you the quilting in more details.

Until Next Time

Keep Stitching

Cynthia

Sunday, June 14, 2020

Great day of Rulerwork Basics

  • My Rulerwork workshops are popular. From the basics to more advance techniques can be learnt during these workshops.
We were on the basic techniques today. Sometimes getting started is there hardest part when starting something new. We all have done it, seen something and dive in head first. Then we get stuck when we try it at home. When I do these workshops I always have a beginner or two in these workshops. Today we focused on the basics of getting started.
Straight lines is always our starting point, followed by circles and rotating templates.


As you can see the ladies have done a fantastic job.  They learnt lots of little tips during the day.  I got a little bit done after class on a project that will be featured in an upcoming rulerwork workshop. It is one thing to practice on quilt sandwiches, but we all love making a project we can take home completed or nearly completed.


One of the great resources we discussed today was the Sew Steady  University, where you can purchase classes and expand your knowledge. I
recommend watching them first and then starting the project. 

The best thing is if you get stuck you can rewatch them. They have some that are free, along with the ones you have to pay for.

I stock the Sew Steady and Westalee Design  products, so if you need something for a workshop please contact me and I am happy to help.
 If I don't have it in stock, I can order it in for you. 

Here is the link to the Sew Steady University.  Pop over and check out what is on offer. Please note if you purchase anything through this link, it will help me expand my knowledge too. That way I can continue help you along your rulerwork journey.

I  have regular rulerwork workshops, so check out the workshop schedule for the next workshops. I only have 4-5 students per workshop. They fill fast, July's workshop is full already.
Until Next Time
Keep Stitching
Cynthia

Wednesday, November 13, 2019

My Day on the Stitch it and Gift it blog hop


Welcome to the Stitch it and Gift it blog hop. Firstly I need to thank Carla for host us again. I hope you have been following all week. There has been lots of great posts so far and we are going to continue on our gift giving way with today's crew
Thursday, November 14th

Now if you have missed the previous days here is the full list for you to visit once you are done here.

Every year I like to make some handmade gifts. Now sometimes I sew something small like pin cushions, handmade cards or I create something in the kitchen, like biscuits, cakes, chocolates etc.
This year I wanted to make some of these reverse applique wall hanging/table runners.

They are made with two layers of fabric with fusible between the fabric layers, right side up with batting and backing fabric, so you have a quilt sandwich. I use 505 basting spray when I baste small projects. Once the sandwich is ready -
Have you ever wonder how food terms are also quilting terms, quilt sandwiches, jelly rolls, layer cakes,etc?
Sorry I am just wondering!
Anyway back on track at this point I used the Westalee Designs Feathered Leaf template for the Black and White pair and the multi colored one  above and I used the Feathers template set for the purple one. Then you quilt the design you want. The possibility are endless with all the rulers available. Once you have finished Stitching the design you use a sharp pair of scissors and cut out the top fabric sections you want to cut out, very carefully so you don't cut through the second layer. See the picture below on the right that has half the leaves cut out.
At this stage you press as per your fusible instructions to help seal your raw cut edges. Then bind your project and hanging sleeve if desired.


These make great gifts, imagine how it would turn out in Christmas fabrics. If I find some free time I may stitch one up in Christmas fabric.
A close up of the purple feather wall hanging.

These are going to some of my family as their Christmas presents.
Now make sure you pop over and visit my blogging friends to see what they have been up to.
Until Next Time
Keep Stitching
Cynthia
PS I do run workshops on this technique in the shop regularly, so if you are in South Australia and are interested please contact me for more details.

Friday, March 29, 2019

Under the Pressure Foot # 33

It has been a long time since I have done a Under the Pressure Foot post July 2017, but today is the day for a post.
Let me start at the beginning. It is Friday 29th March which is my Demo Day in store, the month sees me demoing Ruler work quilting, answering questions and setting quilters on their way on their own ruler work quilting adventure using the Westalee Designs Ruler foot and templates.
The First group of the morning often set the tone for the day when I do a Rulerwork demo. I need to get an idea of skill level before we start. There is no point showing them beginner stuff if they are already past that stage and often no point showing the advanced stuff to a group of beginners as it may scare them off. So the first group in were ladies who have done some ruler work quilting but were looking for something more then me stitching sample designs on 12 inch quilting sandwiches even those my sandwiches are 18 inches.
 After a hearty chat with a cuppa it was decided I was going to quilt a large quilt sandwich with an all over design. The sandwich ended up being 24 x 42 inches and could easily become a quilted panel as part of a bag project or if you just wanted to quilt a quilt with an all over design.

It is the principals on how to get started that are important here. There are some simple steps that make this more achievable. I think that is where some quilters get stuck. They try and things don't quite work out how they wanted it. With a few extra tips to keep them on the straight and narrow a wonderful all over effect can be achieved. That is the main key (straight and narrow) to quilting a large panel with an all over design. You must spend some time at the beginning to set yourself up for success. Get out the chalk pen and ruler and measure up your space and consider your measurement with the template/ruler you plan to use. The ladies chose the apple core template. I then did the maths and double check the measurement of the space I want to quilt by dividing it by the template size which was 2". You want to make sure you fill the space evenly. So I draw up my box then using the straight edge of the 12" arc ruler stitched the box I want to fill. This holds the layers together and keeps your work tight and flat.  I drew in some reference lines to help keep me on the straight and narrow or I will be off on a crazy angle before I knew it. I put in 6" lines both way. Then I was off quilting stopping a couple of times to explain what to do if there is a problem like if you twist your template and wander away from your template, broken threads etc. I think the ladies enjoy their visit.


There was no way I would finish the whole piece in the time allotted for the demo. It means the next group get to see what was started and I continue on with that piece for the rest of the day. Along with me doing some basic beginner's stuff for the the ladies who had come to see ruler work quilt for the first time.  By closing time my piece was finished and I had a few workshop ideas to work on.
My piece finished.


Until Next Time
Keep Stitching
Cynthia

Thursday, October 11, 2018

Janet Collins Visit

A few weeks ago we had Janet Collins visit us at Cynthia's Ark to teach. She was in Adelaide for the Australian Machine Quilting Festival, so the following day she joined us for a one day workshop.


We had a ball and we all learnt lots during the course of the day. Plus after lunch the sewing machines came out and we were able to play under Janet's instructions on a few different projects.  As I was busy I wasn't able to sit down in front of the machine and sew, lots to do to keep things running and helping were help was needed. I was able to soak up the information as the day went on. So last weekend during our Project Uninterrupted session in store I was able to have a go at one of the projects done during the day. This allowed me to use the new Feathered Leaf Template from Westalee Designs and play some more with the Templee technique which I am really enjoying.  Here is my feathers wall hanging before I cut it out then the after shot with the cut outs done.
 A close up shot for you.


Plus we will be do a workshop in February on this technique for any one interested.
Until Next Time
Keep Stitching
Cynthia

Friday, April 20, 2018

Another Beginner's Workshop to Ruler Work Quilting

This has been our most popular workshop this year. This is the second time I have run it and plans for a third one is well under the way in June. We had a very informative workshop starting with the ruler that comes with the ruler foot. This is a very useful ruler to have you can do lots with it as it has the straight side and the arc on the other side.


I have quilted quilts with just this ruler, my double wedding ring is one of them.


After a session at the machine learning how to do a checkerboard pattern and exploring the curved side we stop for a cuppa and some of my Lemon & Coconut Slice.
My sample piece.

In the second half we looked at the Sampler set, Crosshair ruler and book and with a little demo from me they all had a go at their sampler set templates.


From this workshop there is plans to run my Placemat workshop again which I created to use the Westalee Sampler Set to expand your ruler work knowledge. Also I am working on a how to quilt a small project using the Westalee Sampler Set where you will bring a small project ready to quilt and we will explore options on how to quilt your project. With everyone doing different projects you we be open to see how others quilt their project and see options you may not have considered. More details coming soon,

Until Next Time
Keep Stitching
Cynthia 

Sunday, January 1, 2017

Ruler Foot Quilting and My One Month Goal Project

This quilt is next to be quilted after doing some free motion quilting on my Circle Chic quilt, it is time for some ruler quilting on this one.

In the end I use these three Westalee rulers to quilt this quilt. The blocks were quilted  with one of their specialty Circle rulers for the blocks and the first border was quilted with the clamshell ruler from the sampler set. On the second border I used the 12" arc ruler that came with my Ruler foot.

This is what the block quilting looks like. It is easier to see on the back than the front.
This is what it looks like once I completed all the quilting. Just the binding to go.


I am linking up with Elm Street Quilts in their One Monthly Goal challenge so you can pop over and check out the other goals set or join us as we complete our monthly goal by the end of January.
Until Next Time 
Keep Stitching 
Cynthia


Sunday, November 20, 2016

Happy Dance Time


It is time for a little happy dance as I have finished another project of this year list. It is my Quiltmaker Mystery Auld Lang Stitches quilt from 2015 finally done. There is still a lots more projects to finish but this one is on my 2016 Finish Along Q4 list and on my Project Uninterrupted list. So it can be crossed off and I can move on to the next one. I am sure there is one ready for pinning and quilting. I can see an opportunity to do some more FMQ with the rulers in my quilting future. I am enjoying the exploring the possibilities with these rulers and I have a new one to try.

 Back to this finish and I used the 6" spiral ruler only on this quilt which is in the sampler set. Now you can purchase the Westalee Design Ruler foot and ruler from my shop if you are interested to move into the world of FMQ with rulers.

 Have you used rulers when you FMQ? I would love to hear your thoughts on them. Do you love them?  Do you have any issues using them?Do you want to have a go at using them and not sure where to start?  Any thought would be appreciated.
I have this one in my sight next. I can see all those squares with a design in each one. I just need to decide on which ruler/template I want to use.  It will be on top of my 2016 list.
I have linked up with the rest of the 2016 Finish Along Gang so pop over and check out what they have finished.
Until Next Time 
Keep Stitching
Cynthia

Saturday, August 29, 2015

My Inklingo Star Quilt


It has been a while since I finished the quilt top. The poor quilt has been sitting in the To be Quilted pile for 3-4 months and at one stage I had a July deadline for the completion of it. Well July is gone and August is just about done. Finally I have pinned it ready for quilting. Another week goes by. Why can't I decide on how to quilt this one? I could easily have it finished if I just stitched it in the ditches but that just doesn't appeal to me. I think this top was waiting for me to rediscover FMQ again and after a couple tests with the rulers I purchased from Westalee Design I decided on a floral design using the 2' circle ruler from the Sampler set and on the plain blocks I followed the diagonal pattern of the fabric for a zigzag effect.

I used the Inklingo 9' Star collection to make the star blocks which I did by hand and when I quilted it I was easily able to use my seams to line the circle ruler quickly every time for perfect placement of the floral design. There is an Inklingo link in the Right hand side toolbar if you want to learn more about printing on to fabric for precision piecing every time.

So now I am up to the binding stage and I can see the completion of this quilt clearly which is fantastic. I am using the pink stripe that I used for the star centre for the binding.  All the fabric I have used in the quilt is from Sue Daley's To Norway with Love is still available in my shop.


Until Next Time
Keep Stitching
Cynthia

Monday, August 24, 2015

Under the Pressure Foot #10


This weekend I pinned 2 quilt tops ready for some more quilt ruler testing.  So far I am loving the Westalee quilting rulers. I had gone back to doing more straight line free motion quilting as I have been struggling with curves and I had nearly given up on going further with my free motion quilting due to the lack of success. With some new advice on free motion quilting on my machine (and that was the key I needed someone who knew my brand of machine) I have been put back on track. It is true it is the little things the matter. Just having the wrong needle in my machine nearly ruined my free motion quilting adventure. The machine still doesn't like to go backwards but if I can avoid it I will.
 I watched a few more tutorials on the rulers during the week and they have inspired me to try a couple more rulers in the sampler set. First I tried the Spin-e-fex #4 ruler which creates a lovely floral design.

 I did want to use this ruler on my Star quilt but when I sewed the sample it was a little small for my 9' block. That is why I started with this quilt instead of my star quilt that I really wanted to quilt first because it has been sitting here the longest. Never mind it will be next.
 To see the whole front you have to wait a little longer as it is part of a special event coming soon. Keep your eyes open for Cynthia's Ark Fully Stacked for the big reveal. Here is a little bit of the back and a better look of my quilting.

The Westalee Design Ruler Foot  is available in the shop now and a range of their rulers will be available in my shop shortly. When ordering the quilting foot you need to tell me in the comment box as you go through the checkout which machine you plan to use it on as there is 4 sizes available. Once you know which foot you need that will also tell you which size rulers you use with your foot, as the rulers come in 2 sizes.

Until Next Time
Keep Stitching
Cynthia

Wednesday, August 12, 2015

Under the Pressure Foot #9


Here we are ready for some quilting. I recently purchase a new quilting foot and rulers for my Pfaff machine from Westalee Designs. I saw the rulers in action when we were A Quilters Odyssey retreat in June. So once I got home I did some research and I was impressed with what I saw. I went ahead and contacted Westalee Designs to work out which quilting foot would match my Pfaff and with some advise from them I purchase a quilting foot and the Sampler set of rulers to test and to consider stocking their products.
With the instructions included with the quilting foot it didn't take me long to set the foot up correctly on my Pfaff machine.


I started with a practise sandwich as suggested and straight away I was impress with the results. I started with the curve ruler that comes with the quilting foot.
Once I was happy and comfortable with using the ruler I set to quilting my Christmas table runner. I started on the blocks.
This one shows my quilting up the best I am using one of my favourite Aurifil colours 2000 50 wt. It could easily live in my machine all the time that is how often I use this colour.
Then I had to play in the border. I went a little crazy, I don't think I will quilt this close together soon and little bigger gap next time. Two things to remember for next time the Pfaff doesn't like to go backward and think what you are going to do in the corner before starting.
This is what I did in the corners and I am very happy how it turned out but it so easily could of be a disaster.
All quilted.

Binding on and my table runner is completed.

 This is the second finish this month. Yippy! My Little Joys Quilt is next to complete. Just the binding to go.
Until next time
Keeping Stitching
Cynthia