I have been making octagons over the last 6 months with our All Over the Octagon Club. The shop octagons which are on display in the shop have been made with the help of Kate and Maureen. That way there is a few more made than I have the time to make and people see different things in fabric.We end up with some stunning octagon made from the same fabrics.
I select the fabrics each month to go with that month shape and pattern and it is up to you how you use the fabric with the English paper piecing shapes to create your octagon. I have stuck with that month shape and fabric each month but there is enough fabric to mix them up so if you love a fabric you can use it with other month's fabrics to make your octagons.
This one is a favourite and I was asked about a tutorial on how to make it. So here goes.
This block uses 1" half square triangles to make it with the English paper piecing technique which is the focus technique of this whole project.
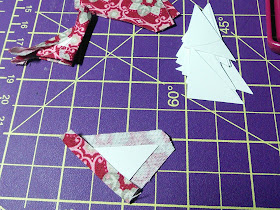
Step 1. Cut out your 32 1" triangles using a rotary cutter and the acrylic template or you can draw around the template and cut them out with scissors. Most of time I will use my rotary cut if I have an acrylic template unless I am fussy cutting a design. I have used 4 fabrics this time but last time only used 3 (16 of one a day eight each of the other fabrics)
Step 2. Basting your fabric triangle on your paper. These days I used a Sue Daley Glue Pen which you can buy from my website or you can sew baste the fabric around the papers (see Tutorial on Sew basting under the Pattern/Tutorial of my blog. It is part of the English Paper Piecing tutorial.)
With the glue pen centre your paper on your fabric triangle and run your glue pen along the edge of 1 side of your paper.(Close to the edge but not right along the edge. This will help when you sew them together as there will be no glue for you to have to sew through. Easier sewing.)
Fold the fabric edge over the paper press firmly. Run glue along the next side and fold the fabric over. Repeat until all the side of your side are fold. When basting your papers fold the fabric around your papers all the same way so all your tails hang out the same way. On some shapes this will help you interlock your shapes and reduce the bulk behind your block.
3. Layout your shapes into your block. For this block I split the block in triangle sections. If you sew them in this sequence you can sew the section with one thread.start at 1 sew to 2 then to 3 and finally sew back to 1 to complete this section.
4. Once you have sections sewn together, lay out your triangles into your final block and sew them together.
5. Now you have a hole in the middle of your block. I press at this point yes with the papers still in place and use the iron to press any tails back under so they don't stick out. There is two ideas for filling the centre, you can cut a square 1/4" larger than the hole if you are not fussed what goes in the centre or you can fussy cut the centre by laying the block on the fabric you plan to use and move it over the fabric until you find some that you like.
At this point I use a erasable pen (like a Frixon pen) and mark the interior edges of your centre on my centre fabric.
Remove your block and use a ruler measure a 1 /4" outside your marks and this is where you need to cut or just cut it out roughly like I did.
6. To hold this piece of fabric to your block so you can sew it in place I put some dots of applique glue around the edge of your block them lay it on your fabric centre. Let it dry or do this on your iron board and use a hot dry iron to set it for you.
7. Start from the back and bring your needle up through the centre fabric and the edge of your block and sew around the centre octagon to secure it in place. Just make sure you tuck the point in if they stick out.
8. Press the completed block with the papers still in, before removing the papers if you are appliqueing to a background block or leave the papers in until you have join more of these blocks together. All depending on your project.
This is the original one that inspired this tutorial with only 3 fabrics for the triangles. I hope you enjoy this tutorial. If you have any questions please ask. I am happy to help. the fabrics used in these octagons are from Sue Daley's Beaujolais fabric range and I carry them in my
webshop.
Until Next Time
Keep Stitching
Cynthia


